Relayers
A relayer is a contract that, once authorized, can perform specific actions on behalf of another account. This includes swaps, joins, and exits, among other operations. For security, a relayer has to be authorized by the Balancer DAO before it can be used, and even after authorization, each user still needs to opt-in by submitting an approval transaction or signing a message explicitly approving the relayer.
Relayers can follow any structure; it is not necessarily to conform to any specific architecture. That being said, if you are considering writing a relayer, it is worth asking yourself if you should write a standalone relayer or implement a module for the Batch Relayer.
Authorizing a Relayer
There are two levels of authorization required to use a relayer: user-level and protocol-level. This double authorization design is important because relayers have access to all of the Vault's token approvals. It is crucial that relayers are implemented in such a way that users are only able to send transactions for themselves and that no account can make use of another account's token approvals.
User Level
On the user level, an account must directly approve a relayer. This can be done in a signature-based one-time approval, or a transaction-based persistent approval. For the one-time approval, the most user-friendly way to do this is to use the Balancer SDK. The implementation for one-time approval is here with example usage here. The persistent method is done by calling vault.setRelayerApproval(...) outlined below:
setRelayerApproval(
    address sender,
    address relayer,
    bool approved)

emits RelayerApprovalChanged(address indexed relayer,
                             address indexed sender,
                             bool approved)
sender- address of the account to be approved (should bemsg.sender)relayer- address of the relayer contract to be approvedapproved-trueif the intent is to allow the relayer;falseif the intent is to disallow the relayer
For completeness' sake, there is one (unlikely) scenario in which sender does not need to be msg.sender: if there is (yet another) a relayer that has permission to call setRelayerApproval itself. Approving a relayer with such a permission should be done with extreme care, if at all, as it effectively grants permissions to add any logic after a user has signed off.
Protocol Level
On the protocol level, the protocol authorizer must be told what actions a relayer is allowed to take on which contracts. Using either grantPermission or scheduleGrantPermission, the protocol admin account (controlled by governance on production networks, developers on testnets, and you yourself on a local instance) can specify allowable permissions. The need for grantPermission or scheduleGrantPermission depends on whether a permission requires a timelock. More sensitive actions require longer timelocks for protocol safety.
function grantPermission(
    bytes32 actionId,
    address account,
    address where
) external;

// or...

function scheduleGrantPermission(
    bytes32 actionId,
    address account,
    address where,
    address[] memory executors
) external returns (uint256);
actionId- keccak256 hash of the target address and function selector for the specified action.account- in this case, the address of the relayer.where- the target contract that the relayer will have permission to execute an action on (often the Vault).executors- (only forscheduleGrantPermission) a list of addresses that are authorized to execute this scheduled permission granting. Empty array implies public execution.
Getting an actionId
For contracts like the Vault, you can query them directly with the function selectors: vault.getActionId(selector).
To generalize a bit more, a Solidity snippet like this can calculate an actionId given a target address and a function definition fn such as "swap((bytes32,uint8,address,address,uint256,bytes),(address,bool,address,bool),uint256,uint256)".
function generateActionId(address target, string calldata fn) public pure returns (bytes32) {
    bytes32 disambiguator = bytes32(uint256(address(target)));
    bytes4 selector = bytes4(keccak256(bytes(fn)));
    return keccak256(abi.encodePacked(disambiguator, selector));
}
The Batch Relayer
The Batch Relayer is a specific relayer contract that allows users to run multiple actions (such as exit/join pools, swaps, etc.) by chaining them together, improving the UX.
How It Works
Contracts
The Balancer Relayers are composed of two contracts, BalancerRelayer, which is the single point of entry via the multicall function, and a library contract, such as the VaultActions, which defines the allowed behavior of the relayer, for example — VaultActions, LidoWrapping, GaugeActions.
Having the multicall single point of entry prevents reentrancy. The library contract cannot be called directly, but the multicall can repeatedly delegatecall into the library code to perform a chain of actions.
Some pseudocode demonstrating how an authorization, exitPool and swap can be chained and called via the multicall function:
const approval = buildApproval(signature); // setRelayerApproval call
const exitPoolCallData = buildExitPool(poolId, bptAmt); // exitPool call
const swapCallData = buildSwap(); // batchSwap call

const tx = await relayer.multicall([approval, exitPoolCallData, swapCallData]);
Approval
A user has to approve each Relayer before they can use it. To check if a Relayer is approved the hasApprovedRelayer on the Vault can be used.
A Relayer can also be approved by using the setRelayerApproval function from the BaseRelayerLibrary contract. Here a signed authorisation message from the user is passed as an input parameter. This allows the approval to be included at the start of a chain of actions so the user only needs to submit a single transaction creating a better UX.
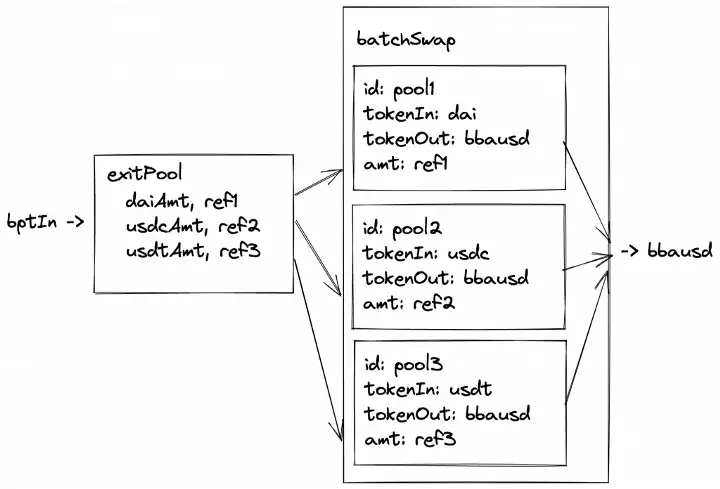
Chained References
Output References allow the Relayer to store output values from one action which can then be read and used in another action. This allows us to chain together actions. For example, we could exit a pool, save the exit amounts of each token to a reference and then do a batchSwap using the references as input amounts for each swap:
An OutputReference consists of an index and a key:
struct OutputReference {
  uint256 index;
  uint256 key;
}
Where the key is the slot the value will be stored at. The index indicates which output amount should be stored. For example, if exitPool exits to 3 tokens, DAI (index 0), USDC (1), USDT (2), we would want to use index 0 to store DAI, 1 for USDC, etc.
Example Use Case - Pool Migration
Intro
Balancer aims for the best capital efficiency for LPs so it made sense to offer the option to migrate from the old “staBal3” pool consisting of DAI, USDC and USDT to a new “boosted” stable pool which is more capital efficient because it uses yield bearing assets.
Migrating between these pools would take multiple steps:
- Unstake from staBal3 gauge -> staBalBpt
exitPoolfrom staBal, staBalBpt -> DAI, USDC, USDT- join the bb-a-usd pool using
batchSwapsa. DAI -> bbausdBpt b. USDC -> bbausdBpt c. USDT -> bbausdBpt - stake bbausdBpt in gauge
This would be quite an ordeal for a user to do manually but the Relayer can be used to combine all these actions into a single transaction for the user.
A full example of this can be found here